HOW TO USE CRIMP TERMINALS THE RIGHT WAY
There are two ways to repair wires – solder and crimp terminals. Some scenarios require you to crimp wire terminals, such as modular terminal connections, and removable terminals, where others can be handled through either method. Soldering is usually the best method to splice two wires together, but that is not always feasible. Crimp terminals are very useful for long-lasting repairs, but they get a bad rap because of consistent poor installation. There are several different types of crimp terminals that require different tools, and they should always be sealed. We have compiled a list of tips and tricks for wire crimps. Use these, and you should never go wrong.
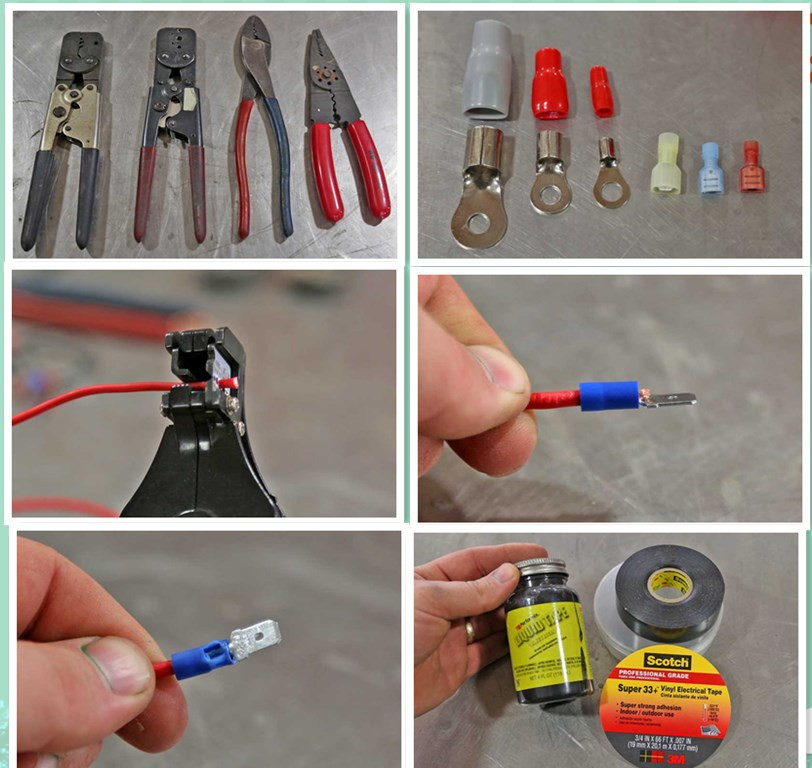
RIGHT TOOL FOR THE JOB
Cheap crimp tools are only good for giving you blood blister, they have no business being used on actual wire crimps. A good set of insulated/non-insulated wire crimpers will only set you back 15-20 bucks and will last you forever. For specialized terminals such as Weather/Metri packs, you need a special crimping tool. These are more expensive, but you can buy a master tool with interchangeable dies that will work for all types of terminals.
ONE SIZE DOES NOT FIT ALL
There is a correct size for every wire gauge and a correct crimping die to match. Insulated terminals are selected by a range of sizes noted by the color of the insulation.
Red- 22 to 16 gauge
Blue- 16-14 gauge
Yellow- 12-10 gauge
Any wire larger than 10-gauge requires a non-insulated terminal. These terminals usually come with a slip-on silicone insulating sleeve, but not always.
PRACTICE SAFE STRIPPING
Removing the insulation from wire requires a good pair of wire strippers. Some strippers require you to pull the wire through them, while others perform the entire task in one motion. The automatic strippers work really well, but they are a little more expensive, starting at around $25, an inexpensive set of pull strippers costs about $10. The key to a good termination is just enough wire in the crimp, not too much, not too little. The end of the wire should be flush or just slightly extended through the end of the crimp. Some terminals have a stop bar for the wire, use this as a guide. The insulation should touch the backside of the terminal barrel (inside the insulation if using an insulated terminal), there should not be bare wire exposed on either end of the crimp barrel.
GO ALL IN
Don’t leave stragglers hanging outside the terminal. Make sure all of the wire makes it into the terminal. An easy way to do this to give the wire a couple of twists after stripping the insulation away.
NO HALF MEASURES
Fully crimp, but don’t over-crimp. It is hard to over-crimp a terminal, but it is possible, and the result is torn metal that breaks in half. The biggest issue is a half-crimp, where the crimp barrel is compressed, but not enough to seat the wire. The result of this is a loose connection that will cause all kinds of headaches and the wire can even come out, which could be dangerous if the wire is powered up. That is a great way to cause a fire. Always test your crimp by tugging on the wire and terminal. If it moves, cut it off and do it again.
ORIENTATION
Only one side of the crimp should be compressed, and which side depends on the terminal. For open terminals, such as weather or Metri-pack terminals, the open legs get crimped. For all barrel-type terminals, the kind that makes a complete circle, the crimp indentation goes to the solid side, NOT where the two ends meet.
WHEN IN DOUBT, USE A BIG HAMMER
Small wires, up to 8-gauge, are easy to crimp with pliers. Once you get up to 4-gauge and larger, you need a better solution. 4-gauge and 1/0 wires are used in cars for battery and ground connections, as well as some custom stereo and electronics applications. You can purchase a special die tool that sets the crimp with a hammer, but there is another way to get there using a hammer and a punch. It is the same basic principle, but without the special tool. Using the large gauge crimping tool is best and has the least potential for smashing fingers , but the hammer and punch will get you fixed up.
SEAL!
While it is not critical to function, sealing crimp terminals is a good idea, especially if the connection is exposed to the elements. Over time, the exposed metal will corrode, building up resistance, leading to an open circuit. Unsealed crimp connections have a self-life of about 10 years. Use good quality electrical tape, heat shrink or liquid electrical tape to seal the terminal.